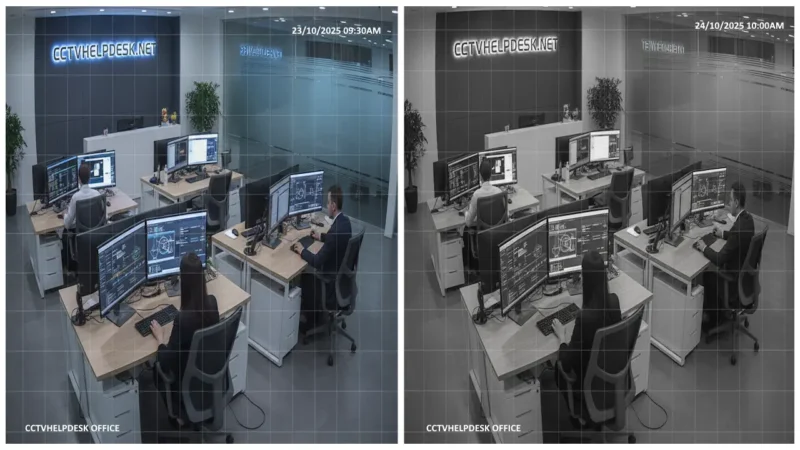
It’s a common and frustrating problem: you check your color CCTV system only to find one or all of the cameras are suddenly showing a black and white image. While your first thought might be a broken camera, the good news is that this issue is rarely a permanent hardware failure.
Most of the time, a camera stuck in black and white is simply “confused” about the lighting conditions. This guide will walk you through why it happens and the step-by-step process to bring the color back.
First, Understand How Your Day/Night Camera Works
To understand the problem, you first need to know how modern CCTV cameras produce images in both day and night.
Your camera has two primary modes:
- Day Mode (Color): The camera sensor captures the full spectrum of visible light, giving you a clear, color image.
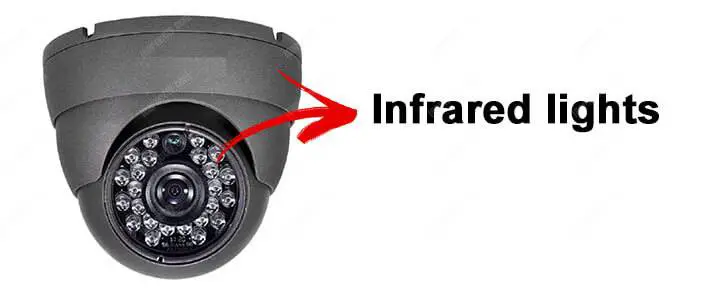
- Night Mode (Black & White): When light is low, the camera switches to a black and white image. This mode is far more sensitive to light and is combined with the camera’s built-in Infrared (IR) LEDs. These LEDs flood the area with infrared light, which is invisible to the human eye but very visible to the camera sensor, allowing it to see in total darkness.
The magic happens with two key components:
- The Light Sensor: A tiny sensor (photocell) on the camera’s face that measures the amount of ambient light.
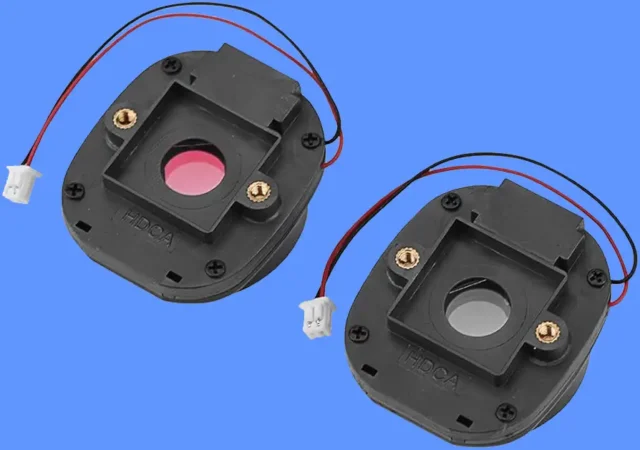
- The IR Cut Filter: A tiny, physical piece of glass inside the camera.
- During the day, this filter sits in front of the sensor to block infrared light. This is crucial for accurate color representation (our eyes don’t see IR, so an unfiltered camera would make trees look pink).
- At night, when the light sensor detects darkness, it signals the camera to mechanically move the filter away from the sensor. You can often hear a faint “click” sound when this happens. This allows all the IR light from the LEDs to hit the sensor, giving you a bright B&W image.
The problem you’re facing is that your camera is stuck in Night Mode. Here’s why.
Common Reasons for a Black and White Image in CCTV
1. Low Ambient Light
The most obvious reason: it’s simply too dark for the camera to stay in color mode. The light sensor is working correctly and has switched to B&W night vision.
2. Dirty or Obstructed Light Sensor
This is the most common culprit. The small light sensor is covered by dust, dirt, spider webs, or even a small insect. The camera falsely “thinks” it is nighttime and refuses to switch back to day mode.
3. Stuck IR Cut Filter
The physical filter that moves back and forth can get mechanically stuck. This is a common point of failure, especially in older or cheaper cameras. Even with bright daylight, the filter remains in the “night” position, blocking true colors and keeping the image in B&W.
4. Incorrect Camera Settings
- Incorrect Day/Night Mode: The camera’s “Day/Night Mode” setting, found in the DVR/NVR menu, may be manually set to “Night” or “B&W” instead of “Auto.” This forces the camera to stay in night mode permanently.
- Analog Signal Mismatch (For Analog/BNC Cameras): On hybrid DVRs, the channel for your camera might be set to the wrong video format. For example, an AHD camera might be incorrectly configured as a TVI camera in the DVR’s settings. This mismatch can cause a distorted, unstable, or completely black and white picture.
5. Insufficient Power
The camera may be receiving enough power to turn on, but not enough to operate all its features. The mechanical action of moving the IR cut filter requires a small surge of power. A faulty power adapter, a cable run that is too long, or a failing power-over-Ethernet (PoE) switch can cause the camera to default to its low-power B&W mode.
6. Firmware Glitch
A temporary software bug in the camera or NVR/DVR can cause the Day/Night switching to fail.
How to Fix Your Black and White CCTV Camera: A Step-by-Step Guide
Follow these steps in order, from easiest to most complex.
Step 1: The Flashlight Test
This is the single best diagnostic test you can do.
- Go to the camera during the day.
- Shine a very bright flashlight (a phone flashlight works well) directly at the camera’s lens and light sensor.
- Hold it there for 10-15 seconds.
What to look for:
- Did you hear a “click”? Does the image on your monitor switch to color? If YES, the camera’s mechanism is working. The problem is simply that the area is too dark, or the light sensor is dirty.
- Did nothing happen? If the image stays in B&W even with a bright light shined directly on it, the problem is likely a stuck filter, a software setting, or a power issue.
Step 2: Clean the Camera Lens and Sensor
If the flashlight test worked (or even if it didn’t), your next step is to clean.
- Use a soft, microfiber cloth to gently wipe the entire camera dome or lens.
- Pay special attention to the small, separate light sensor.
- Clear away any spider webs, built-up dust, or grime that could be blocking light.
Step 3: Check the Camera’s Software Settings
This is a very common oversight.
- Log into your NVR, DVR, or the camera’s IP address directly.
- Navigate to the settings for that specific camera.
- Look for a menu labeled “Image,” “Display,” “Video,” or “Day/Night.”
- Find the “Day/Night Mode” setting. It might have options like:
- Color
- B/W (or Night)
- Auto (or Automatic)
- Schedule
- Ensure this setting is on “Auto.” If it’s on “B/W” or “Night,” you’ve found your problem. Set it to “Auto” and save the changes.
Step 4: Power Cycle the Camera (The “Reboot”)
Just like a computer, rebooting the camera can clear temporary glitches and often un-stick a finicky IR filter.
- For IP Cameras (PoE): Unplug the Ethernet cable from the back of the NVR or switch for 30 seconds, then plug it back in.
- For Analog Cameras: Unplug the 12V DC power adapter that powers the camera, wait 30 seconds, and plug it back in.
Listen for the “click” as the camera boots up. This often resets the filter to its correct position.
Step 5: Check the Power Supply
A weak power source is a hidden cause of many camera problems.
- For Analog Cameras: Make sure the power adapter is providing the correct voltage (usually 12V) and sufficient amperage (e.g., 1A or 2A). Try swapping the adapter with a known-good one.
- For IP Cameras (PoE): If the Ethernet cable run is very long (approaching 100m / 328ft), the power delivery may be weak. Also, check that your PoE switch or NVR isn’t overloaded and is providing enough power for all connected cameras.
Step 6: The “Gentle Tap” (For a Stuck Filter)
If you suspect the IR cut filter is mechanically stuck (steps 1-5 didn’t work), you can try one last physical fix. Gently tap the side of the camera’s housing with your knuckles. This slight vibration can sometimes be enough to jiggle a stuck filter loose.
Step 7: Update Firmware
Check your camera or NVR manufacturer’s website for any available firmware updates. A new update may fix a known bug that causes this issue.
You may find helpful: CCTV Camera Not Working in DVR – No video Problem Solved
What If It’s Still Stuck?
If you have tried all the steps above and the camera remains in black and white, it’s highly likely the camera itself has a permanent hardware fault. The IR cut filter mechanism is likely broken and cannot be repaired.
At this point, your only solution is to replace the camera.
Quick Tips for Prevention
- Keep them clean: Regularly (every few months) wipe down camera lenses and sensors to prevent dust and web buildup.
- Ensure good lighting: If a camera is in a perpetually dim or shadowy area, it may flicker between modes. Consider adding a small motion-activated light.
- Use quality hardware: Invest in good quality power supplies and cables to ensure stable operation.
Conclusion
A CCTV camera stuck showing a black and white image is one of the most common issues users face, but it’s rarely a sign of a critical failure. In most cases, the camera is simply stuck in “Night Mode” due to a dirty light sensor, an incorrect software setting, or a temporary power issue.
By following the logical diagnostic steps—from the simple flashlight test and cleaning to checking your NVR’s settings and power-cycling the device—you can resolve the problem yourself more than 90% of the time. If the issue persists after these troubleshooting steps, you can be confident that the camera has an internal hardware fault, like a broken IR cut filter, and will need to be replaced.
