Configuring your CCTV system is confusing, especially the various CCTV Encode Settings like bitrate, frame rate, and resolution. It’s easy to make a critical mistake: set them too high and exhaust your cctv storage, or set them too low and get blurry, useless video.
Worse, incorrect CCTV Encode Settings can cripple your entire system. A high bitrate can overload your network, causing the dreaded video lag, freezing, and dropped frames that can even crash your DVR/NVR or PC.
This guide simplifies these options. We’ll show you how to configure your CCTV Encode Settings to find the perfect “sweet spot,” balancing clear video, storage, and performance from analog to 4K.
Why Your CCTV Camera Resolution – CCTV Encode Settings Matter
Before we change any settings, it’s important to understand why we are doing it. It’s all about finding the perfect balance between three things:
- Video Clarity (Quality): This is the entire reason you have cameras. Can you see a face? Can you read a license plate? Can you identify the object in someone’s hand? Higher resolution and bitrate deliver better clarity.
- Storage Space: How many days of recording can you save before your hard drive is full and starts overwriting the oldest footage? Higher quality video creates much larger files, using more cctv storage.
- Network/System Load (Performance): Can your network handle the data from 16 different cameras at once? Can your NVR’s processor and your computer’s CPU handle decoding all that video for live view without lagging or freezing? This is a major issue in professional settings like banks and offices where many cameras are viewed simultaneously.
Your goal is to find the “sweet spot” where quality is good enough for your needs, your storage lasts your desired number of days, and your entire system runs smoothly.
Want to test how each setting affects storage?
Try different resolutions and bitrates with our CCTV HDD Calculator below to compare results.
The 5 Key cctv encode settings That Control Your Video Stream
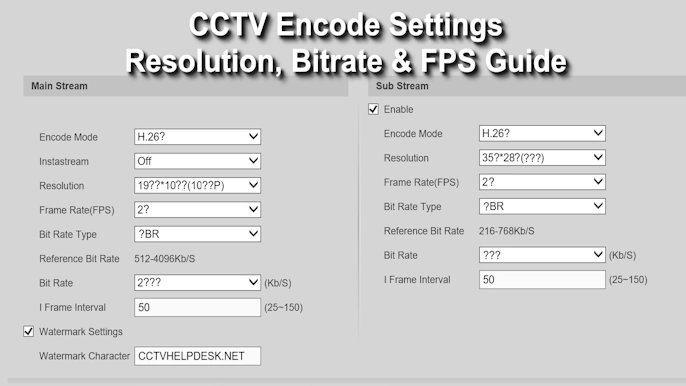
You will find these five settings in your DVR/NVR or camera’s “Encode,” “Video,” or “Stream” configuration menu.
1. Resolution (Image Size)
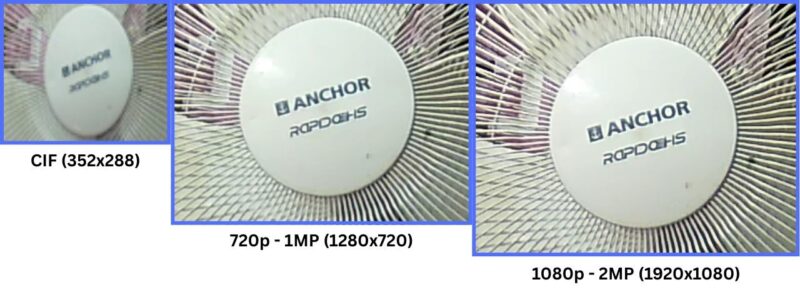
Think of resolution as the size and “shape” of the picture, measured in pixels. More pixels mean more detail.
- Low Resolution (e.g., D1, 720p): The picture is smaller and contains less detail. It can look “blocky” or fuzzy when you zoom in.
- High Resolution (e.g., 1080p, 4K): The picture is very large and full of fine detail, allowing you to zoom in on recordings and still see clearly.
2. Frame Rate (FPS)
FPS stands for “Frames Per Second.” Video is simply a series of still pictures (frames) shown in rapid succession. The FPS determines how “smooth” the motion in the video appears.
- Low FPS (1-8 FPS): The video looks choppy, like a series of photos. This is often fine for general surveillance of a low-traffic area (like a storage room) and saves a massive amount of storage.
- Standard FPS (12-15 FPS): A common and excellent balance. It captures motion well enough for most security purposes without using excessive data.
- High FPS (25-30 FPS): This is “real-time” or “broadcast” smoothness. It’s essential for high-motion areas (like a casino table or a busy cash register) but uses significantly more storage and network bandwidth.
3. Bitrate (Kbps or Mbps)
This is the single most important setting for video quality. Bitrate is the amount of data your camera is allowed to use every second to create the video file. It’s measured in Kilobits per second (Kbps) or Megabits per second (Mbps). (Note: 1024 Kbps = 1 Mbps).
- Low Bitrate: Low data = small file = lower quality. Even with 4K resolution, a low bitrate will force the camera to compress the video so much that it becomes a blocky, pixelated mess.
- High Bitrate: High data = large file = higher quality. A high bitrate allows the camera to preserve fine details, color, and clarity, especially during motion.
Think of it this way: Resolution is the size of the canvas, but Bitrate is the amount of paint you’re allowed to use. A giant 4K canvas with a tiny amount of paint (low bitrate) will look terrible.
4. Bitrate Type: VBR vs CBR
In your settings, you will almost always have to choose between VBR and CBR.
- CBR (Constant Bitrate): The camera uses the exact same amount of data every second, whether the scene is an empty, static hallway or a full-blown riot. This is predictable for storage calculations but extremely wasteful, as it uses maximum data even when nothing is happening.
- VBR (Variable Bitrate): This is the “smart” option and the recommended choice for 99% of surveillance. The bitrate changes based on the scene’s complexity. When the scene is empty, the bitrate drops (saving storage). When someone walks by, the bitrate instantly increases to capture the motion clearly.
Recommendation: Always use VBR. When you select VBR, you will still set a “Recommended” or “Max Bitrate” (e.g., 4096 Kbps). This tells the camera to average around that number, but not to exceed it, giving you the perfect balance of efficiency and quality.
5. Video Compression (Codec: H.264 vs H.265)
This is the “algorithm” the camera uses to “zip” or compress the video file to make it smaller.
- H.264 (or AVC): The older, universal standard. It works with virtually all devices and software. It’s reliable but creates larger files.
- H.265 (or HEVC): The new, more efficient standard. H.265 provides the same video quality as H.264 but at 40-50% less file size. This is a massive saving in both storage space and network bandwidth.
- H.264+ / H.265+: These are “Smart Codecs” (see next section).
Recommendation: If your cameras, DVR/NVR, and viewing software (PC or mobile) all support H.265, use it. You will nearly double your storage capacity. If you have older equipment, H.264 is still a solid choice.
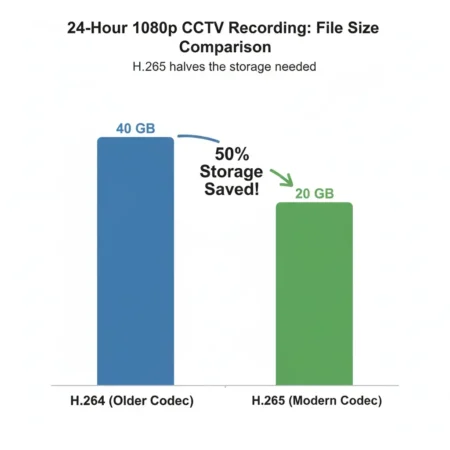
To learn more, see this technical comparison of H.264 vs. H.265 for security cameras.“
Going Deeper: Smart Codecs and Advanced Settings
What are H.265+ and H.264+?
These are “smart” codecs developed by manufacturers (like Hikvision and Dahua). They are an enhanced version of VBR. They work by:
- Using an ultra-low bitrate and frame rate when the scene is static (e.g., an empty office at night).
- Instantly increasing the bitrate and frame rate to your full-quality settings (e.g., 20 FPS, 4096 Kbps) the instant motion is detected.
- Using advanced background noise reduction to further save data.
This “dynamic” approach can save up to 80-90% on storage and bandwidth in low-activity scenes compared to standard H.264.
What is GOP (Group of Pictures)?
You might see a “GOP” or “I-Frame Interval” setting. This is an advanced setting that determines how many frames are between each full “key-frame.” A key-frame (I-frame) is a complete, high-quality image. The frames in between (P-frames and B-frames) only record the changes from the previous frame.
- A higher GOP (e.g., 50) means fewer key-frames, which saves data.
- A lower GOP (e.g., 25) means more key-frames, which uses more data but can improve quality in very high-motion scenes and make scrubbing through video smoother.
Recommendation: For most users, it’s best to leave this at the default setting. A good rule of thumb is to set the
GOP value to be 2x your Frame Rate (e.g., 15 FPS = 30 GOP), but the default is usually fine.
The Critical Difference: Main Stream vs. Sub-stream
This is the most important concept for preventing lag and system crashes. Your DVR/NVR and cameras actually produce two video streams at once:
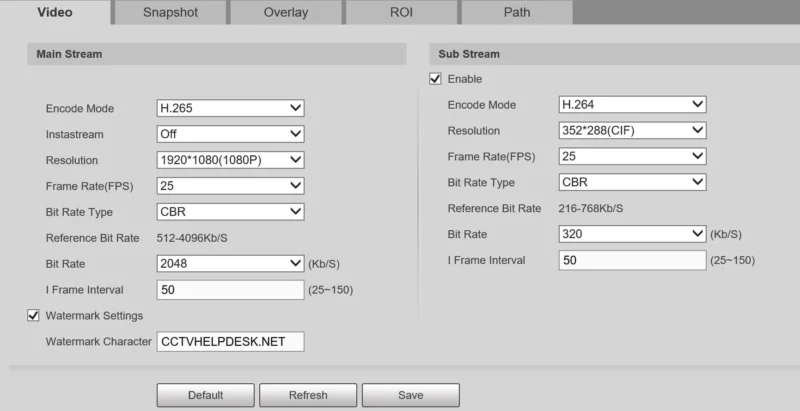
- Main Stream: This is the high-resolution, high-quality stream used for recording to your hard drive. This is where you apply your 1080p/4K settings. You want the best quality possible here for evidence.
- Sub-stream: This is a separate, low-resolution, low-bitrate stream used for live viewing, especially in multi-camera grids (e.g., 4, 9, or 16-camera views) and for viewing on your mobile phone.
This is the secret to a smooth system. When you watch 16 cameras at once, your NVR and PC don’t try to decode 16 full 4K streams. That would crash the system. Instead, they show you the 16 small, efficient sub-streams. When you double-click one camera to make it full-screen, it then switches to the high-quality Main Stream.
Recommendation: Set your Sub-stream to a low resolution like CIF (352×288) or D1 (704×576) with a low bitrate (e.g., 512 Kbps). This ensures your live view is always fast, responsive, and stable, while your high-quality recordings are safely stored in the background.
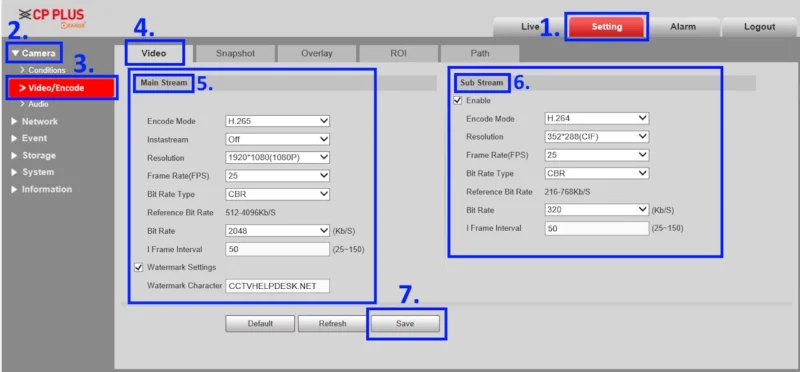
How to Find CCTV Encode Settings
You can usually find these settings by logging into your NVR or directly into the camera’s IP address using a web browser.
- Log in with your administrator username and password.
- Look for a main menu option like “Configuration,” “Settings,” or “Setup.”
- Inside that menu, look for a sub-menu named “Camera,” “Video,” “Encode,” or “Stream.”
- Here, you will almost always see two tabs or sections: “Main Stream” (for recording) and “Sub-stream” (for live viewing).
- You must set the encoding for both. Use the settings from this guide for your “Main Stream” and set the “Sub-stream” to CIF or D1 at 512 Kbps.
Recommended CCTV Encode Settings (The Guide)
Here are our recommended “sweet spot” settings. These are balanced for good quality and stable network performance.
A Note on These Bitrates: These recommendations are for VBR (Variable Bitrate) and are a good maximum or average value. The H.264 recommendations provide excellent quality. If you use H.265, you can safely lower these bitrate values by 40-50% and achieve the same quality.
Quick Reference Chart: Recommended Settings (using H.264)
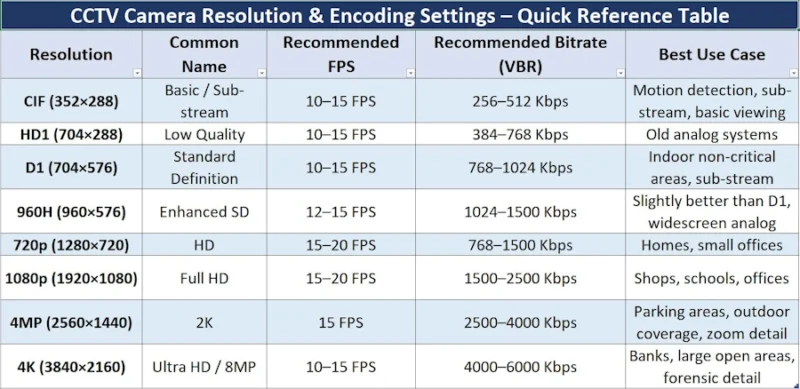
Legacy Analog Resolutions (CIF, D1, 960H)
Best For: Older analog systems or as a high-quality Sub-stream.
- CIF (352×288) / D1 (704×576) / 960H (960×576)
- Frame Rate (FPS): 10-15 FPS
- Bitrate (VBR): 512 Kbps – 1536 Kbps (1.5 Mbps)
Note: These resolutions are not “HD” and will provide fuzzy, non-detailed images by modern standards. Only use them if required by old equipment.
720p (HD – 1 Megapixel – 1280×720)
Best For: A basic, clear HD image for general-purpose home or small office use.
- Frame Rate (FPS): 15 FPS
- Bitrate (VBR): 1024 – 2048 Kbps (1-2 Mbps)
Note: This is a good “budget” HD option. Setting the bitrate below 1024 Kbps will result in a very blurry image during motion.
1080p (Full HD – 2 Megapixel – 1920×1080)
Best For: The new standard for almost all professional and high-quality home systems. Excellent for identifying faces and details in retail, offices, and homes.
- Frame Rate (FPS): 15-20 FPS
- Bitrate (VBR): 2048 – 4096 Kbps (2-4 Mbps)
Note: A 2 Mbps setting is a good streaming-friendly balance. A 4 Mbps setting provides excellent recorded detail. If you use H.265, a 2048 Kbps (2 Mbps) setting is perfect.
4MP (2K – approx. 2560×1440)
Best For: Areas where you need to digitally zoom in on recordings, such as parking lots (for license plates) or large lobbies.
- Frame Rate (FPS): 15 FPS
- Bitrate (VBR): 3072 – 5120 Kbps (3-5 Mbps)
Note: At this level, H.265 is highly recommended. If you set the bitrate too low, you lose the entire benefit of the 4MP resolution; a 1080p camera at 4 Mbps will look better than a 4MP camera at 3 Mbps.
4K (8MP – 3840×2160)
Best For: Forensic-level detail, covering large open areas (stadiums, warehouses) or critical points (bank teller lines, entrances).
- Frame Rate (FPS): 10-15 FPS
- Bitrate (VBR): 6144 – 10240 Kbps (6-10 Mbps)
Note: Streaming 4K live is extremely difficult and not recommended for multi-camera views. Use the Sub-stream exclusively for live viewing. For recording, a minimum of 6-8 Mbps (using H.265) is required to get a true 4K-quality image. Setting it lower will result in a large, “fake” 4K image that is blurry and blocky.
A Practical Example: CCTV Encode Settings for 1080p Resolutin
Here are practical, balanced settings for a 1080p camera on a shared network (like an office) to achieve clear quality and perfectly smooth live viewing.
- Main Stream (Recording):
- Video Compression: H.265 (if supported, otherwise H.264)
- Resolution: 1920*1080 (1080p)
- Frame Rate (FPS): 20
- Bitrate Type: VBR
- Max Bitrate: 2048 Kbps (This is a 2 Mbps H.265 setting, equivalent to ~4 Mbps in H.264)
- Sub-stream (Live View):
- Video Compression: H.264
- Resolution: 704×576 (D1)
- Frame Rate (FPS): 12
- Bitrate Type: VBR
- Max Bitrate: 512 Kbps
This setup provides high-quality 1080p recordings while ensuring that your live multi-camera view is fast and uses minimal network data, preventing lag and “frame freezing.”
Conclusion: Test, Tweak, and Find Your Balance
There is no single “best” cctv encode settings. The best configuration for you depends entirely on your needs.
- Need high detail and to zoom in? Focus on high Resolution (1080p, 4MP) and a healthy Bitrate (4 Mbps+).
- Need smooth live streaming? Focus on the Sub-stream. Make sure it’s set to a low resolution (CIF/D1) so your NVR/PC can handle it.
- Need to save storage? Use H.265, VBR, and lower your Frame Rate (15 FPS is fine for most uses).
Our final and most important tip: Always test your settings. After you make a change, watch the live video and a playback recording. Is it clear? Is it smooth? Does it meet your needs? If yes, you have successfully found your perfect balance.
