CP Plus has solidified its place as a top choice for security solutions in India. However, whether you’re setting up a single IP camera or a complex multi-device network, the first technical hurdle is often the same: finding the IP address of each device. An IP address is like a street address for your camera on your local network, and without it, you can’t view, manage, or record footage.
This is exactly why the CP Plus IP Finder Tool exists. This free utility is designed to eliminate the guesswork, making your CCTV setup smoother and more efficient. This guide will walk you through everything you need to know, from downloading the tool to using it to manage your network and fix common problems.
What Is the CP Plus IP Finder Tool?
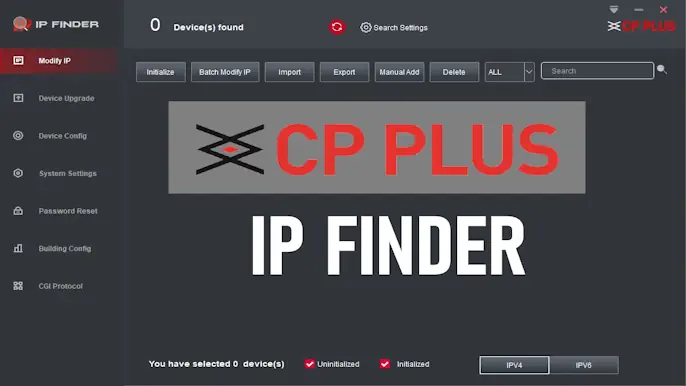
In simple terms, the CP Plus IP Finder (also called CP Plus Device Search) is a small software program for Windows that scans your home or office network. Its job is to automatically locate and list every connected CP Plus device it finds.
Why you need it:
- To Find New Devices: When you plug a new camera into your network, this tool instantly finds its default IP address.
- To Manage Existing Devices: It shows you the IP addresses of all your current CP Plus cameras, DVRs, and NVRs in one place.
- To Configure Network Settings: You can use it to change a camera’s IP address to match your NVR’s network range or resolve IP conflicts.
- To Simplify Software Setup: When adding cameras to software like KVMS Pro, you need the correct IP, and this tool provides it reliably.
The tool supports all modern CP Plus IP Cameras, DVRs, and NVRs and is compatible with Windows 7, 8, 10, and 11.
How to Download and Install the IP Finder Tool
Getting the software is a quick, two-step process. Following these steps ensures you get the official, malware-free version.
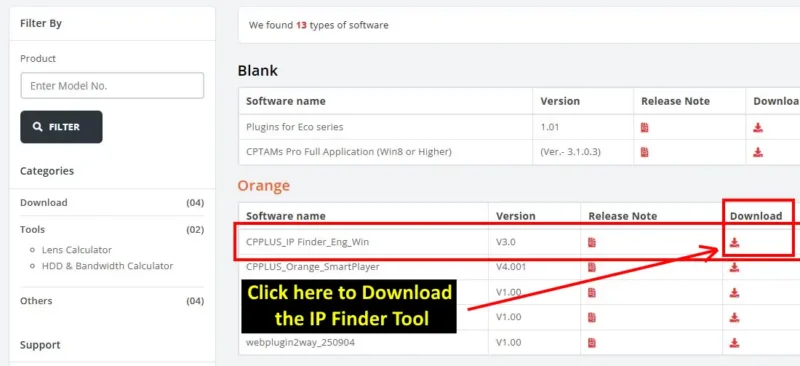
Step 1: CP Plus IP Finder Download from the Official Source
It is critical to only download this utility from the official CP Plus website. Third-party sites may bundle the software with unwanted programs or malware.
- Go to the official CP Plus website’s support or download section.
- Search for “IP Finder Tool” or “Device Search Tool.”
- Download the latest version available.
Official Website: IP Finder Tool Download
Looking for CCTV software? Visit our Software Download Page to find and download all tools and softwares for free in one place.
The CP Plus IP Finder Tool is made specifically for CP Plus CCTV devices.
If you’re using Dahua cameras, check our detailed article on the Dahua ConfigTool.
Likewise, for Hikvision users, we’ve explained everything about the Hikvision SADP Tool, which helps you find and manage devices easily.
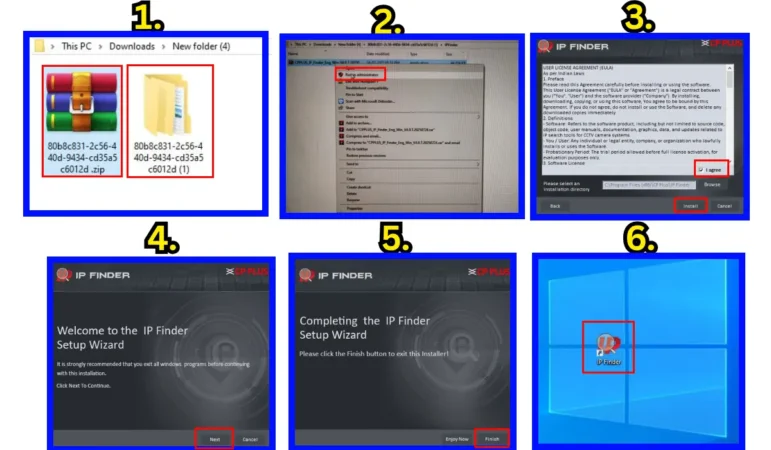
Step 2: Install the IP Finder Tool
- Unzip the File: The download usually comes as a
.zipfile. Right-click it and choose “Extract All…” to a folder on your desktop. - Run the Installer: Open the new folder and double-click the setup file (e.g.,
setup.exe). It’s best practice to right-click the file and select “Run as administrator” to prevent permission issues. - Follow the On-Screen Prompts: The installation wizard is straightforward. Click “Next,” accept any terms, and complete the installation. A shortcut should appear on your desktop.
Using the CP Plus IP Finder Tool: A Practical Walkthrough
Once installed, the tool is incredibly easy to use. Make sure your computer and CP Plus devices are all connected to the same network router before you begin.
Part 1: Finding Your Devices
- Launch the CP Plus IP Finder Tool from your desktop.
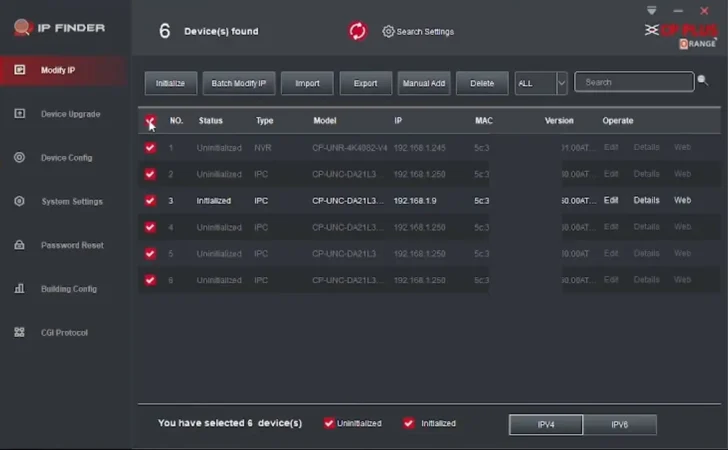
- The program will open. Click the “Search” button, usually located at the bottom.
- The tool will now scan your network. Within seconds, it will populate a list with all the CP Plus devices it finds.
The list will display essential information for each device, including its current IP Address, MAC Address, Device Model, and Firmware Version.
Part 2: How to Change a Device’s IP Address
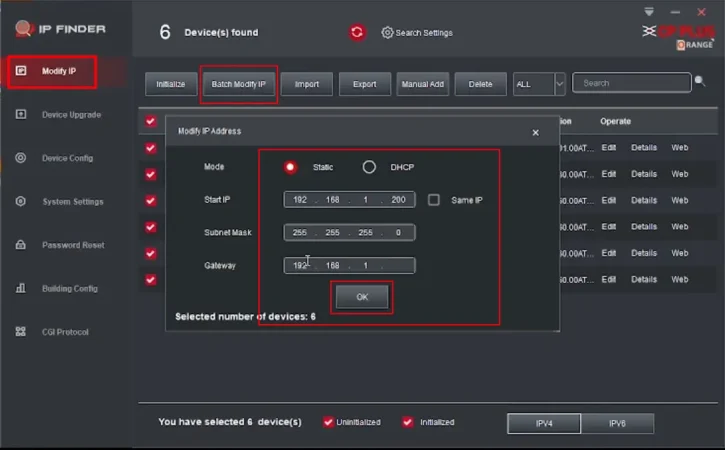
You may need to change an IP address to avoid conflicts or to ensure your camera and NVR are on the same network range (e.g., both starting with 192.168.1.x).
- In the device list, tick the checkbox next to the device you want to configure.
- Click the “Modify IP” button.
- A new window will appear. Here, you can enter the new IP Address, Subnet Mask, and Gateway.
- You must also enter the Username and Password for that device.
- Click “OK” to save. The device will restart and apply the new network settings.
Alternative Ways to Find Your Camera’s IP
While the IP Finder Tool is the best method, here are a few other options:
- Your Router’s Admin Panel: Log in to your router’s configuration page and look for a “Connected Devices” or “DHCP Client List.” This will show the IP address of every device on your network.
- Mobile Apps (gCMOB/iCMOB): The official CP Plus mobile apps have a feature to scan the local network for devices when you add a new one.
Troubleshooting: When Things Go Wrong
If the tool isn’t working as expected, don’t worry. Here are solutions to the most common issues.
- Problem: No devices are found after clicking “Search.”
- Solution 1 (Network Check): Ensure your computer and CP Plus devices are physically connected to the same router. Check your Ethernet cables.
- Solution 2 (Firewall): Your Windows Firewall or antivirus software might be blocking the scan. Temporarily disable it and try searching again.
- Solution 3 (Admin Rights): Close the tool and re-launch it by right-clicking the icon and selecting “Run as administrator.”
- Problem: You get an “IP Conflict” message.
- Solution: This means two devices on your network have the same IP address. Use the “Modify IP” function in the tool to assign a unique IP to one of the conflicting devices.
- Problem: The “Modify IP” function fails or gives an error.
- Solution: This is almost always due to entering the wrong device password. Double-check that you have the correct admin password for the camera or NVR and try again.
Pro Tips for a Secure and Stable System
- Always Use Static IPs: For permanent installations, use the IP Finder to set a static (unchanging) IP for each camera. This prevents connection issues after a power restart.
- Keep a Record: Note down the IP address and location of each camera in a spreadsheet or notebook.
- Change Default Passwords: The first thing you should do with any new device is change its default admin password to something strong and unique.
Frequently Asked Questions (FAQs)
Q1: Is the CP Plus IP Finder Tool free to use?
Ans: Yes, it is a 100% free utility provided by CP Plus to help customers manage their devices.
Q2: Can it find my Wi-Fi cameras?
Ans: Absolutely. As long as your computer is on the same Wi-Fi network as your CP Plus wireless cameras, the tool will detect them.
Q3: Can this tool help if I forgot my camera’s password?
Ans: No, the tool cannot be used to reset a lost or forgotten password. For that, you must follow the official password reset procedure from CP Plus support.
Q4: Will it work with other camera brands like Dahua or Hikvision?
Ans: No, this tool is designed exclusively for CP Plus products. Other brands provide their own respective discovery tools.
Q5: Is the tool compatible with Windows 11?
Ans: Yes, the latest version of the CP Plus IP Finder Tool works perfectly on Windows 11.
9. Conclusion
The CP Plus IP Finder Tool is an essential utility for anyone with a CP Plus security system. It transforms the potentially technical task of network management into a simple point-and-click process.
By making it easy to find, identify, and configure your devices, this free tool empowers you to build a more stable and reliable security setup.
