KVMS Pro is a powerful Central Management Software (CMS) designed for your PC. It acts as a centralized command center for all your CP Plus and ONVIF-compatible security devices, including IP cameras, DVRs, and NVRs. With it, you can watch live feeds, play back recorded footage, export critical evidence, manage multiple locations, and control advanced cameras—all from a single, intuitive interface.
This comprehensive guide will walk you through everything you need to know. By the end, you’ll be able to confidently install, configure, and use KVMS Pro to manage your security system like a professional.

What is KVMS Pro & Why You Need It?
KVMS Pro (Key Video Management System – Professional) is a free desktop client primarily for Windows and macOS. Think of it as the brain of your surveillance operation. Instead of logging into each camera or recorder individually, KVMS Pro brings them all under one roof.
Key Advantages of Using KVMS Pro:
- Centralized Control: Manage dozens of cameras across different locations (e.g., your home, office, and warehouse) from one screen.
- Multi-View Monitoring: Watch up to 64 camera feeds simultaneously in customizable grid layouts.
- Advanced Playback: Easily find and export video clips from any of your recorders with a user-friendly timeline.
- PC-NVR Functionality: Turn your computer into a dedicated video recorder, saving footage directly to your PC’s hard drive.
- Total Camera Control: Manage PTZ (Pan-Tilt-Zoom) cameras, set up automated tours, and respond to alerts.
- Free of Cost: It’s free software, especially when used with CP Plus devices, offering professional features without the price tag.
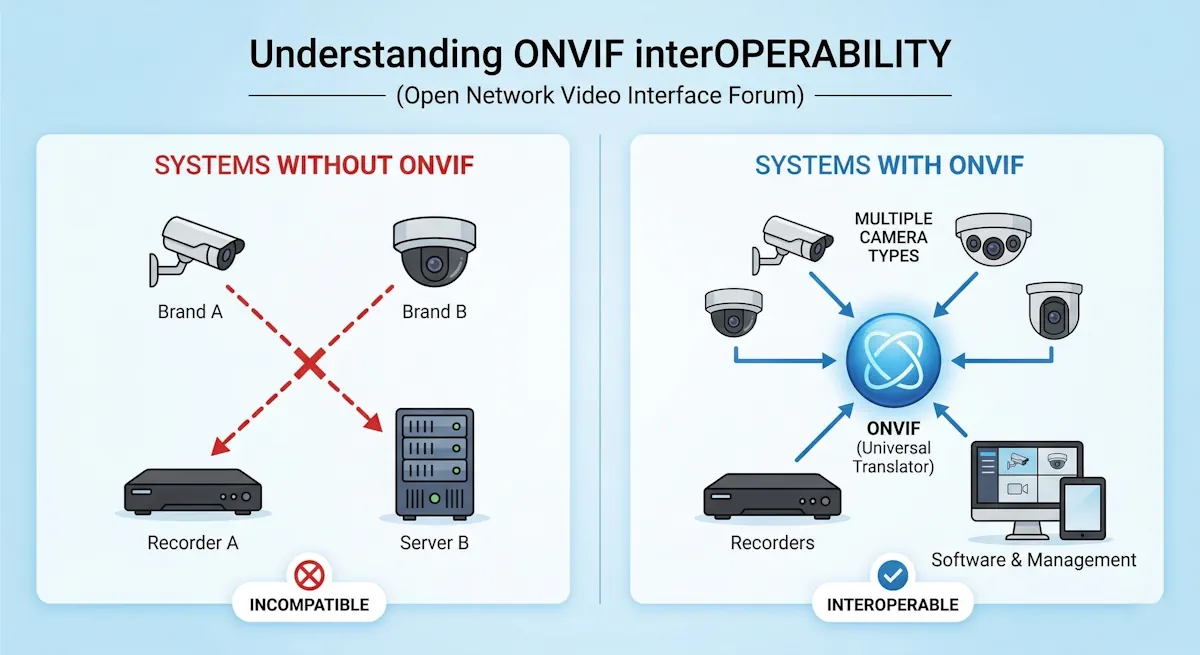
- Broad Compatibility: While optimized for CP Plus, it supports any brand that is ONVIF-compliant, making it highly versatile.
Securely Download the Latest KVMS Pro Software
You can download the KVMS Pro software using the button below.
Important Note: For maximum security, always download software from the official CP Plus website. Before installing, we recommend scanning the downloaded file with a reputable antivirus program.
KVMS Pro – Step-by-Step Installation Guide
Installing KVMS Pro is straightforward. Follow these detailed steps to get it up and running correctly.
- Locate and Extract the Installer: Find the downloaded file (e.g.,
KVMS_Pro.zip) in your ‘Downloads’ folder. Right-click it and select Extract All… to unzip its contents. - Run as Administrator: Navigate to the extracted folder. Right-click the
.exeinstaller file and choose Run as administrator. This is crucial as it grants the necessary permissions for the software to install system services. - Accept Windows Prompts: If a User Account Control (UAC) window pops up asking “Do you want to allow this app to make changes to your device?”, click Yes.
- License Agreement: On the welcome screen, click Next. Read and accept the license agreement by checking “I Agree,” then click Next.
- Component Selection: You will be asked which components to install.
- KVMS Pro Client: This is the main application. It is mandatory.
- Storage Service (PC-NVR): Select this only if you want to record video footage directly onto your computer’s hard drive.
- Click Next.
- Choose Installation Location: The default path is usually
C:\Program Files\. It is recommended to keep this unless your C: drive is low on space. Click Next. - Create Shortcuts: Tick the Desktop Shortcut box for easy access, then click Install.
- Firewall Permissions: During installation, the Windows Defender Firewall may prompt you to allow access for KVMS Pro. Click Allow access, ensuring the “Private networks” box is checked.
- Complete the Setup: Once finished, click Finish. You can leave “Launch KVMS Pro” checked to open it immediately.
- Set Your Admin Password: On the very first launch, KVMS Pro will prompt you to create a password for the local
adminuser. Choose a strong, memorable password and save it in a safe place
A Deep Dive into KVMS Pro’s Core Features
Here’s how to use the most important features of KVMS Pro for effective surveillance.
1. Device Management: Adding Your DVRs, NVRs and IP Cameras
To view your cameras, you first need to add them.
- Auto Search (Easiest Method):
- Go to Devices.
- Click Auto Search. The software will scan your local network for compatible devices.
- Select the devices you want to add, enter their username and password, and click Add.
- Manual Add (for Remote or Specific Devices):
- Go to Devices and click Add.
- Choose your add method: IP/Domain or P2P (Serial Number).
- Fill in the details:
- Device Name: A friendly name, e.g., “Office DVR.”
- IP / Domain / Serial: The relevant connection detail for your device.(CP Plus IP Finder Tool helps you find and modify the IP address of your device)
- Port: The device’s service port (e.g.,
$25001for TCP). - Username & Password: The login credentials for the device itself.
- Click Save. The device status should show a green “Online” dot.

2. Real-Time Live Monitoring
The ‘Live View’ is your main dashboard.

- Custom Grids: View cameras in various layouts (1,4,9,16,32,64). Drag cameras from the device list on the left into any tile.
- Full-Screen Focus: Double-click any camera’s tile to view it in full screen. Double-click again to return to the grid.
- Stream Switching: Right-click on a camera feed to switch between Main Stream (high quality, high bandwidth) and Sub Stream (lower quality, smooth viewing on slower connections).
- Instant Snapshots: Click the camera icon below a feed to instantly save a picture to your PC.
3. Recording: PC-NVR vs. Device Recording
KVMS Pro offers two recording methods:
- Standard (Record on DVR/NVR): This is the most common setup. Your DVR or NVR records footage to its internal hard drive. KVMS Pro simply acts as a viewer to play back that footage.
- PC-NVR (Record on Computer): By enabling the “Storage Service,” your PC becomes the recorder. This is useful for creating a backup or if you don’t have a dedicated recorder. To configure this, go to Storage Settings and assign a hard drive partition for recordings. Warning: This consumes significant disk space and CPU resources.
4. Playback & Exporting Evidence
This is where you investigate incidents.
- Navigate to the Playback tab.
- On the left, select the Device and the specific Channel (camera) you want to review.
- Choose the Date and Time Range.
- Click Search. A color-coded timeline will appear. Green typically means continuous recording, while yellow indicates motion-triggered events.
- Click anywhere on the timeline to begin playing. Use the controls to fast-forward, slow down, or go frame-by-frame.
- To Export a Clip: Use the scissor icons to mark a Start Time and End Time. Click the Export button, choose a format (MP4 is most compatible), and select a destination folder.
5. PTZ Control and Automated Tours
For Pan-Tilt-Zoom (PTZ) cameras:
- In Live View, click on a PTZ camera feed.
- A PTZ control panel (with arrows and zoom icons) will appear.
- Presets: Move the camera to a key position (e.g., “Main Entrance”) and save it as a preset. You can then instantly jump back to this view later.
- Tours: Create a sequence of presets. The camera will automatically move between these points, scanning a wide area without manual intervention.
How to Set Up Remote Access (Two Secure Methods)
Viewing your cameras from outside your local network is a key feature. Here are the two main ways to set it up.
Method A: P2P / Serial Number (Beginner-Friendly)
This is the easiest method and requires no router configuration.
- On your DVR/NVR’s system menu, find and enable the P2P or InstaOn (Cloud) feature.
- Note down the Serial Number (SN) or use your phone to scan the QR code.
- In KVMS Pro on your remote PC, go to Devices → Add.
- Select the method as SN (for P2P).
- Enter the Serial Number, device username, and password.
- Click Save. If your DVR/NVR is connected to the internet, the status will turn green.
- Pros: Extremely easy to set up. No technical knowledge of routers needed.
- Cons: Relies on the manufacturer’s cloud server. An internet connection is required for the DVR/NVR.
Method B: Static IP / DDNS & Port Forwarding (Advanced)
This method provides a direct connection to your system for potentially faster performance.
- Assign a static local IP to your DVR/NVR (e.g.,
192.168.1.108). - Set up DDNS (Dynamic DNS) on your router or DVR/NVR. This gives you a memorable domain name (e.g.,
myhome.dvr.com) that points to your home network, even if your public IP address changes. - Log in to your router and create Port Forwarding rules. You need to forward the device’s TCP and HTTP ports to its static local IP.
- In KVMS Pro, add the device using the IP/Domain method. Use your DDNS address as the IP and enter the correct port.
- Pros: Potentially faster connection, less reliance on third-party servers.
- Cons: Technically complex, requires router configuration, and can create security vulnerabilities if not done correctly.
Troubleshooting Common KVMS Pro Issues (Problem & Solution)
Problem: Device is Offline.
- Solution: Ping the device’s local IP from your PC to check connectivity. Verify the network cable is plugged in. Double-check that the password in KVMS Pro matches the device’s current password.
Problem: Black Screen / No Live Video.
- Solution: Ensure the camera has power. Try switching to the Sub Stream first, as it’s less demanding. Temporarily disable your PC’s firewall or antivirus to see if it’s blocking the video stream.
Problem: Playback shows “No Record File”.
- Solution: Confirm that recording is enabled on the DVR/NVR itself. Check that the system time and date on both the PC and the recorder are synchronized. Ensure you are searching the correct date and channel.
You may find helpful: Fix CCTV Wrong Date and Time
Problem: High CPU Usage on PC.
- Solution: Reduce the number of cameras in your live view grid. Use the Sub Stream for grid views and only switch to the Main Stream for single-camera focus. Close other resource-heavy applications.
Problem: Cannot export video clips.
- Solution: Right-click the KVMS Pro icon and Run as administrator. Ensure you have enough free disk space. Try exporting to a simple folder path like
D:\CCTV_Exports.
Problem: P2P / Serial Number connection fails.
- Solution: Log into your DVR/NVR and confirm that the P2P status is “Online.” Ensure the device is connected to the internet. Double-check that you have typed the serial number correctly.
Security Best Practices (Your Non-Negotiable Checklist)
An unsecured CCTV system is a liability. Follow these rules without exception:
- Change Default Passwords: This is the most important step. Change the password for your DVR/NVR, all your cameras, and the KVMS Pro
adminaccount. - Use Strong, Unique Passwords: Combine uppercase letters, lowercase letters, numbers, and symbols. Do not use personal information.
- Update Firmware: Regularly check for and install firmware updates for your cameras and recorder. Also, use the latest version of KVMS Pro.
- Use a VPN for Remote Access: If possible, a VPN is far more secure than opening ports on your router.
- Enable Auto-Logout: Set KVMS Pro to automatically log out after a period of inactivity to prevent unauthorized access.
- Use a UPS (Uninterruptible Power Supply): Connect your recorder, cameras (via PoE switch), and router to a UPS to prevent recording interruptions during power outages.
Want to know how long your CCTV will keep running during a power cut?
Use our CCTV UPS Backup Time Calculator — it quickly tells you how much backup time your system can provide when there’s no main power.
Frequently Asked Questions
1) Is KVMS Pro free?
Yes, it is generally free to use, especially with CP Plus devices.
2) Will it work without internet?
Yes. On LAN, live view and playback work fine. Internet is only required for remote access or P2P.
3) Can I run it on macOS?
Some releases support macOS. However, Windows builds are most common and stable.
4) How many cameras can I view?
Depends on your PC. Grids like 16 or 32 are common. Up to 64 is possible on strong machines.
5) Can I use other brands of cameras?
Yes, if they are ONVIF-compatible. Features like PTZ or motion may vary by brand.
6) Do I need the PC turned on to record?
Only for PC-NVR mode. If you record on the DVR/NVR, it records even if PC is off.
7) How do I export a clear proof video?
Use Playback, set mark-in/mark-out, export as MP4, and keep the original timestamp visible.
8) Can I watch camera with audio too?
Yes, if the camera has a microphone and audio is enabled in the stream.
9) Does KVMS Pro support two monitors?
Yes. You can pop-out windows or use multi-screen views.
Conclusion
KVM Pro is an exceptionally capable tool that transforms your collection of cameras into a cohesive, professional-grade security system. By offering centralized live monitoring, robust playback, and flexible remote access, it provides immense value at no cost.
By following this guide, you now have the knowledge to install the software correctly, manage your devices efficiently, and troubleshoot common problems. Remember to prioritize the security best practices to ensure your system remains a reliable asset that protects what matters most.
🔗 Related CMS Software Articles
If you are using other CCTV brands, here are some helpful guides for their CMS software:
- iVMS 4200 Software – Download, Installation, and Configuration (Full Guide) – For Hikvision devices.
- Smart PSS Software – Full Setup and User Guide – For Dahua devices.
👉 Each software works as a CMS (Central Management Software) similar to KVMS Pro, helping you view, manage, and control multiple CCTV cameras from one computer.


")